We have already Generic Technology Connector (GTC) why Flat File Connector?
1. In flat file connector if we face any error then it will generate one failed data file , but in GTC there is failed data file.
2. In flat file reconciliation we will get logs, but in GTC there is no logs
Step 1:
Unzip the Flat File Connector FlatFile-11.1.1.6.0
Navigate to path: C:\11gR2PS3softwares\Connectors\FlatFile-11.1.1.6.0\metadata-generator\resources\FlatFileConfiguration.groovy
FlatFileConfiguration.groovy open with Notepad++/Notepad
Step 2:
Change as it is below highlighted data
/*
* Run like:
* In Windows: FlatFileGenerator.cmd ..\resources\FlatFileConfiguration.groovy trusted
* In Linux/Unix: sh FlatFileGenerator.sh ../resources/FlatFileConfiguration.groovy trusted
*/
trusted {
/*
* ITResource name
*/
itResourceDefName=’Flat File Trusted’ // This will be used as a base name for all metadata across the connector
itResourceName=”$itResourceDefName” //the same as itResourceDefName by default
/*
* Output files
*/
connectorDir=”../$itResourceDefName” // output dir of the connector, is the same as it resource name by default
// xmlFile=’FlatFileTrusted-ConnectorConfig.xml’ // name of the dm xml of the connector
// configFile=’FlatFileTrusted-CI.xml’ // name of the config xml
// propertiesFile=’FlatFileTrusted-generator.properties’ // name of the resources/properties file
// version=’11.1.1.6.0′ // connector version
/*
* Trusted/Target mode
* For trusted, we will not create forms, dataobjects and event handlers
* For target, we will create all above metadata
*/
trusted=true // Flag to denote if the mode is trusted or not
/*
* Location of the flat file bundle jar
*/
bundleJar=’../../bundle/org.identityconnectors.flatfile-1.0.1115.jar’
/*
* The Configuration used to run the flat file bundle mentioned above, and get the schema by calling its SchemaOp, which is required for generating metadata
*/
config = [
‘schemaFile’ : ‘D:/11gR2PS3softwares/Connectors/FlatFile-11.1.1.6.0/FlatFile-11.1.1.6.0/metadata-generator/schema.properties’ //first we need to create schema.properties file I attached code below please note it
]
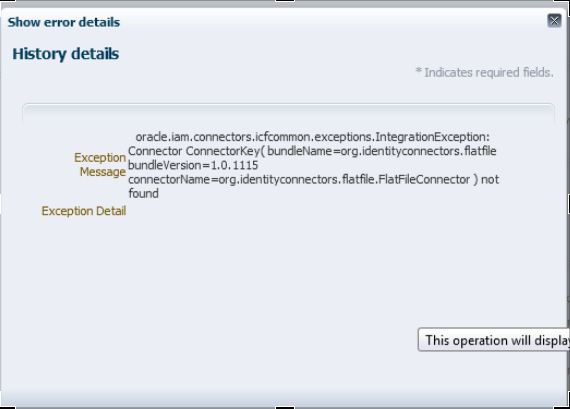
java.io.FileNotFoundExceptionD:\11gR2PS3softwares\Connectors\FlatFile-11.1.1.6.0\FlatFile-11.1.1.6.0\metadata-generator\flatfile.properties
/**
* Provide the attribute list that need to be handled as Date on process form
* Make sure these fields datatype in schema should be long
* dateAttributeList is not a mandatory field
**/
//dateAttributeList = [“JoiningDate”]
/**
* Alias are used to map the OIM User Form attributes with the Connector Attributes.
* The Format is of ‘Connector Attribute’:’OIM User Form Attribute’
* Mandatory alias shouldn’t be removed. Customer can update these mandatory attributes but should not be removed
* Customer can add other aliases to the OIM User form fields
**/
// Mapping is mandatory for attributes User Login, Last Name,Organization, Xellerate Type and Role. One can modify the required mappings but shouldn’t delete them.
//UID field is not required in trusted but if customer wanted to add UID field then one can map it to a valid OIM User Form Label
// Some of the OIM User attributes are not used with the same display name internally. so here are the list of attributes that need to be mapped with the internal name then display name
/**
Display Name Internally Used Name
————— ———————-
Organization Organization Name
Manager Manager Login
E-mail Email
*/
alias = [‘__NAME__’:’User Login’, ‘LastName’:’Last Name’,’Organization’:’Organization Name’, ‘Employee Type’:’Xellerate Type’, ‘Role’:’Role’]
//Extend the aliases to include more connector attributes for trusted by mapping
//alias += [‘__ENABLE__’:’Status’, ‘FirstName’:’First Name’, ’email’:’Email’, ‘JoiningDate’:’Start Date’]
}
Step 3:
schema.properties:
#Schema file for ACME User
#List of fields
FieldNames=UID,UserId,FirstName,LastName,email,Organization
#Unique ID Attribute
UidAttribute=UID
#Account Name attribute
NameAttribute=UserId
#Multivalued attributes
#Groups.Multivalued=true
#Roles.Multivalued=true
#Subfields for complex child form
#Roles.Subfields=RoleName,Start_Date,End_Date
#Complex child form objectClass
#Roles.EmbeddedObjectClass=MyROLES
#Datatypes (Default:String)
#Roles.Start_Date.DataType=Long
#Roles.End_Date.DataType=Long
FirstName.DataType=String
LastName.DataType=String
email.DataType=String
Organization.DataType=String
#JoiningDate.DataType=Long
#Incremental reconciliation attribute with datatype set to Long
#LastUpdated.DataType=Long
#Parent and child form mandatory fields
#Roles.RoleName.Required=true
#Date format
#SystemDateFormat=ddmmyy
#Account Status Attribute and Mapping
#StatusAttribute=status
#status.True=Enabled
#status.False=Disabled
Step 4:
This is the time to generate flat file trusted connector
Run like:
In Windows: D:\11gR2PS3softwares\Connectors\FlatFile-11.1.1.6.0\metadata-generator\bin\FlatFileGenerator.cmd ..\resources\FlatFileConfiguration.groovy trusted
Step 5:
After successful generation of trusted connector
Flat File Trusted will be created in D:\11gR2PS3softwares\Connectors\FlatFile-11.1.1.6.0\metadata-generator
Unzip the Flat File Trusted
Step 6:
Copy the unzip Flat File Trusted
Navigate oracle home connector default directory and paste here
S:\oracle\middleware\Oracle_IDM1\server\ConnectorDefaultDirectory\
Step 7:
Now we need to create one csv file for loading the users into OIM
SAMPLE CSV:
UID,UserId,FirstName,LastName,email,Organization
102,Ramana2,Ramana,Murthy,ramana.murthy2@ojas-it.com,murthysoft
103,Ramana3,Ramana,Murthy,ramana.murthy3@ojas-it.com,murthysoft
Step 8:
Go to sysadmin console edit ItResource
Flat File Trusted Users
Parameters: value:
———————————————————————————————————————————–
Configuration Lookup: : Lookup.Flat File Trusted.FF.Configuration.Trusted //it will come by default donot change
Connector Server Name : leave blank
Schema File : C:\11gR2PS3softwares\Connectors\FlatFile-11.1.1.6.0\FlatFile-11.1.1.6.0\metadata-generator\flatfile.properties
———————————————————————————————————————————–
Step 9:
Go to System management→ Schedularers →
Run:
Flat File Trusted Flat File Users Loader
Note :
Flat File directory: only give upto folder name where csv file exists
Step 10: